Staring at a blank page can feel frustrating and overwhelming. Many people struggle to find the right words to begin writing, often leading to wasting time or giving up altogether. But you don’t have to face this problem anymore. Starting with a blog post outline can make writing much easier and less stressful.
When you create a blog post outline, you can:
- Break the writing process into simple, manageable steps.
- Organize your ideas clearly, so everything makes sense.
- Make sure you include all the important points.
- Create a structure that is easy to read and understand.
- Share your plan upfront with editors, clients, or team members.
Research from the Content Marketing Institute shows that marketers who use structured planning, like outlines, are 30% more likely to produce engaging and successful content.
Here, we’ll explore all the tools and effective outline structure that simplifies your writing and helps you provide content that truly connects with your audience.
Quick View
Why Use an Outline for Writing a Blog Post?
An outline helps you organize your ideas, avoid writer’s block, and create content that’s easy to follow. It ensures each section has a purpose and that your key points are well-presented. Outlines also save time by keeping your writing focused and preventing unnecessary tangents.
How to Write an Outline for a Blog Post
1. Start with a Clear Goal
Before you begin outlining your blog post, take the time to clearly define its purpose.
Ask yourself: Are you trying to inform your audience with valuable insights, take action, or entertain them with engaging storytelling? Understanding your goal will shape how you structure your outline and the type of content you include.
For instance, if your purpose is to inform, your outline might focus on presenting key facts, research, or step-by-step instructions in a logical order.
If you aim to persuade, your outline should include arguments, evidence, and emotional appeals to influence your readers.
On the other hand, for entertainment, your outline could emphasize storytelling, humor, or relatable anecdotes to captivate your audience.
A clear purpose acts as a roadmap, every section of your blog post aligns with your objective. It prevents you from veering off-topic and helps maintain a consistent tone throughout the post.
2. Brainstorm Key Points
Writing down the main points you want to include in your content is one of the most important steps in the writing process. It helps you stay organized, ensures you do not forget any important details, and makes your content more thorough.
Instead of jumping straight into writing, taking a moment to jot down key ideas gives your work a solid foundation and makes the whole process easier to manage.
Why Write Key Points?
Key points serve as a roadmap for your writing. They give your content structure and ensure that your message flows logically. For example, if you’re writing about how to create a blog post outline, your key points might include:
- Choosing a Topic: How to select a subject that aligns with your audience’s interests.
- Researching Keywords: Finding terms that improve SEO and attract readers.
- Organizing Sections: Breaking your blog into an introduction, main body, and conclusion.
How to Organize Key Points
- Use Bullet Points: Quickly jotting down ideas in bullet form makes them easy to expand later.
- Prioritize: Start with the most critical points and work your way to supporting details.
- Group Related Ideas: Cluster similar concepts together to create a natural flow in your content.
Example:
If your blog is about “Improving Page Speed,” your key points might look like this:
- Importance of fast-loading websites for user experience and SEO.
- Common issues that slow down websites (e.g., unoptimized images, large scripts).
- Tools to measure page speed (e.g., Google PageSpeed Insights).
- Practical steps to improve speed (e.g., compressing images, using a CDN).
3. Make Sections Logically
Arrange your key points into sections that flow smoothly. Begin with an introduction, followed by the body, and end with a conclusion. Each section should build on the previous one.
Example:
- Introduction: Importance of weight loss.
- Section 1: Healthy eating tips.
- Section 2: Exercise routines.
- Conclusion: Final thoughts and encouragement.
4. Add Subheadings for Clarity
Subheadings break up large blocks of text and make it easier for readers to skim. They also improve SEO by incorporating related keywords naturally.
Example:
- “Healthy Eating Tips” could become “How to Eat Right for Weight Loss.”
5. Add Supporting Data
Adding real data and examples to your blog posts not only improves credibility but also keeps readers engaged. When readers see factual evidence supporting your points, they are more likely to trust your content and find it valuable.
Using trusted sources like surveys, academic studies, or industry reports adds authority to your writing. Credible data shows that your arguments are not just opinions but are backed by reliable evidence. For instance, quoting a report from HubSpot or Statista lends more weight to claims about content marketing trends.
Quick Tips:
- Choose Credible Sources: Use studies, industry surveys, or authoritative websites like government or educational institutions.
- Visualize Data: Include charts, graphs, or infographics to make statistics easier to understand.
- Cite Properly: Always mention the source to build trust and allow readers to verify information.
- Balance with Context: Don’t overload your post with numbers. Explain how the data supports your points.
Blog Outline Template

Here’s a simple blog outline template you can use for any post:
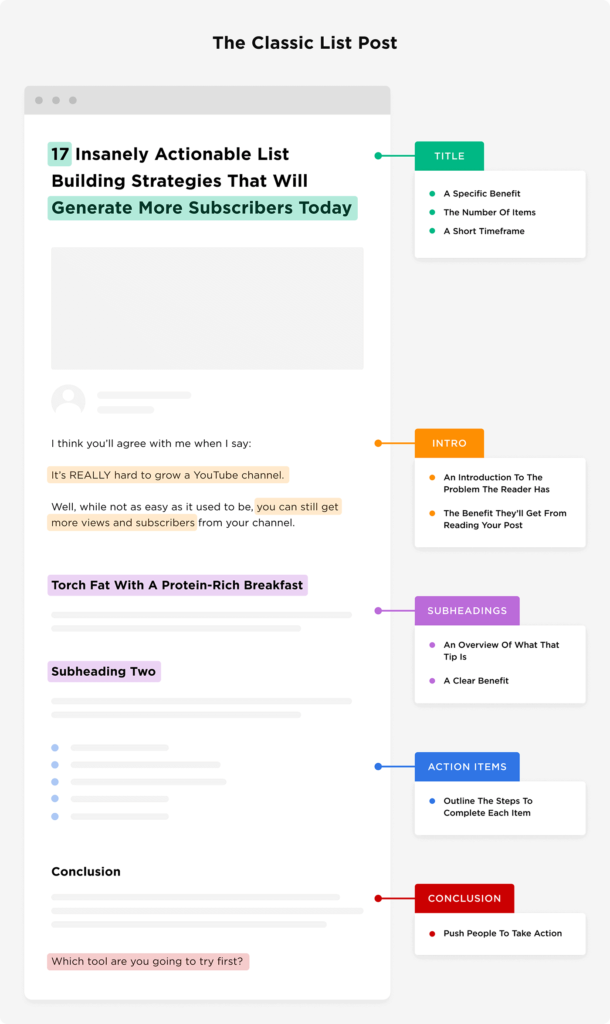
- Title: Include your main focus keyword.
- Introduction: Briefly introduce the topic, outline the main problem, and state what the reader will learn.
- Body:
- Section 1: Main idea (use a related keyword as the subheading).
- Section 2: Supporting details with examples or data.
- Section 3: Final point with a takeaway.
- Conclusion: Summarize the blog post, offer final thoughts, and include a call to action.
Tips for Writing a Blog Post Outline
- Keep It Simple: Don’t overcomplicate the outline. Use brief points to guide your writing.
- Focus on Reader Intent: Understand what your audience wants and structure the outline around their needs.
- Be Flexible: While outlines provide structure, feel free to adjust as your blog evolves.
- Use Keywords Naturally: Incorporate your focus keyword and related keywords into headings and content sections without stuffing.
How to Do an Outline for a Blog Post Effectively
- Research First: Gather data before creating your outline to ensure your content is fact-based.
- Group Similar Ideas: Keep related ideas together to avoid confusing readers.
- Visualize the Flow: Ensure the outline flows logically from the introduction to the conclusion.
- Be Concise: Each section of your outline should have a specific, concise point.
Example of a Blog Outline
Let’s create a blog outline for “The Best Morning Routines for Productivity.”
- Title: Best Morning Routines for Productivity
- Introduction: Why a morning routine is crucial for success.
- Body:
- Section 1: Start your day with hydration.
- Section 2: Exercise for energy and focus.
- Section 3: Plan your day effectively.
- Conclusion: How a solid morning routine can improve productivity.
Common Mistakes to Writing a Blog Post Outline
- Overloading with Information: Keep your points simple to avoid overwhelming your readers.
- Lack of Focus: Ensure each section relates to your blog’s main goal.
- Skipping Research: Always back up your key points with credible data or examples.
Outlining a blog post is the foundation for creating engaging, well-structured content. A solid outline keeps your writing focused, improves readability, and ensures your blog meets your audience’s expectations. Follow this guide and use the blog outline template to create clear, concise, and impactful blog posts.


